A thin quilt, it is also a thick warm blanket, so appropriate for autumn evenings, it is easy to sew from several pairs of old jeans with your own hands.
The plaid turns out beautiful, multifunctional, strong and durable. You can use it in different ways, and stitching is quite simple, even if you are not a pro in patchwork and quilting.

Mat from old jeans: a master class
You will need:
- jeans - in this case, about 15-18 pairs of jeans were bought at a garage sale, you can also look into your stocks or go into a second-hand. Check that there are no holes in the jeans. To make the plaid about one shade, it is better to choose jeans of similar colors and without obvious contrasting wear. If desired, you can choose jeans so as to make a gradient;
- flannel for the reverse side;
- if desired, a thin synthetic winterizer (in this case, it was decided to do without it to make the plaid more mobile, you can "warm" it);
- braid or slanting inlay for processing edges;
- a roller knife (can be replaced with scissors, but it’s more convenient to work with a knife) and a mat-substrate;
- ruler (ideally - ruler for patchwork);
- masking paper tape - it will help with stitching, so take tape with a width corresponding to the distance between the stitch lines;
- sewing machine and thread;
- tailor pins;
- iron.
What to make of old jeans: 19 great ideas
Step 1
Wash, dry and iron all jeans, do the same with the flannel.
Step 2

Cut the jeans into strips. It is convenient to do this with the help of such a ruler for patchwork, a special rug and a roller knife. Well, if you cut out elongated knees and worn places, not letting them work, this will make the plaid more uniform and durable. The main thing is that all the strips turn out to be the same width, along the length they can be all different.
Step 3

Sort the strips by color. If you want to make a colorful plaid, you can alternate different stripes, and if the gradient - first use dark, then lighter.
Step 4

Lay out the strips on a large surface in the order you will sew them.
Do-it-yourself blankets: 6 simple workshops
Step 5

Sew the short sides first, then connect the long strips into a single fabric. Iron seams. Gather the whole canvas.
Step 6
Attach the flannel to the patchwork for the back of the plaid. You may need to sew a multi-piece fabric. Do it, iron the seams. The flannel part should be approximately equal to the patchwork part. Fold them with the wrong sides inward, align and sweep as well as possible. If you decide to use a synthetic winterizer, lay a layer between the layers of fabric before washing.
Step 7


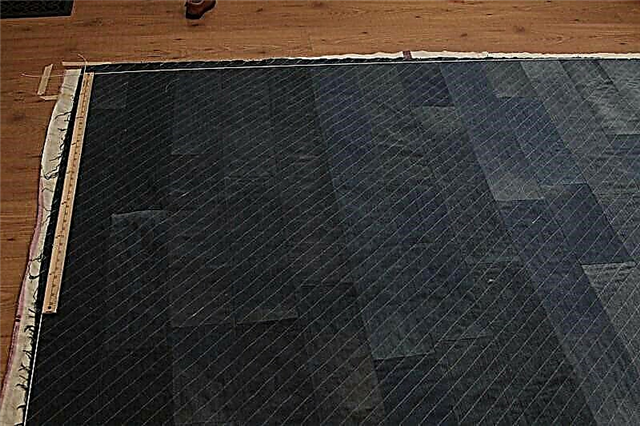
Now we need to quilting a plaid. Determine the direction of the stitches and draw one of the lines in chalk. Glue a strip of tape along the line. Sew along the strip, near the edge of the tape.When finished, remove the adhesive tape and attach a new strip along the sewn stitch. Quilting the entire canvas of the plaid.
Step 8
Lay the plaid on a flat surface. Trim the edges using a ruler. Cut off the unnecessary.
Step 9

Process the plaid around the perimeter with braid or oblique trim. Done!
Photo and source: itsalwaysautumn.com