Made using cup-shaped decoupage technique, they resemble miniature works of art. You will make the basis according to our drawing, and then paste over it with several layers of multi-colored paper.
They can be stacked on top of each other or stored in them various necessary trifles for the household or for needlework. Lovers of dried flower compositions, they also serve well. To do this, put a piece of polystyrene cut into shape inside and, making holes in it with a knitting needle, insert stems of dried flowers into them.
Tip: choose a paper with a pattern to match your interior or corner that you want to decorate with these vases for the outer layer.
Such cup vases are made very simply:
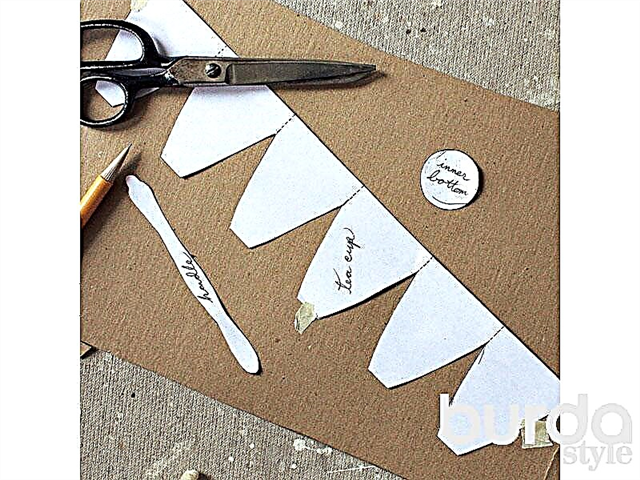
STEP 1 Draw on the sheet of thin cardboard the template that you see in the photo. Separately measure and cut the bottom of the cup, the bezel for the bottom and the handle. Add 1 mm (or a little more) to the sides to be glued.
STEP 2 Glue the sections of the lower parts of the sides along the bottom from the outside with narrow strips of adhesive tape, then glue them from the inside. Now glue the upper parts of the cuts, also first from the outside, then from the inside.
STEP 3 Glue the completely cut lateral sides according to the allowances and then additionally glue them on the top and bottom also first from the outside, then from the inside with strips of adhesive tape.


STEP 4 Use adhesive tape to glue the bottom of the cup. Now the shape of the resulting object resembles a cup.
STEP 5 To make the cup stand better, glue the cardboard rim to the lower edges.
STEP 6 Paste paper that absorbs moisture well (preferably newspaper) and soak it with wallpaper glue. Stick on each other pieces of paper on cups.


STEP 7 In principle, you can do with a single layer, but for greater product strength it is better to stick several layers of paper.
STEP 8 The cup handle can be painted with watercolors or pasted over with tiny pieces of paper. While the handle is wet, curl its ends a little.
STEP 9 The main form of cardboard can be pasted over with white paper, and then painted with watercolors. On the upper edge, you can glue tiny rhinestones or beads, or decorate in any other way.


Photo and Design: Anne Wood.
Material prepared by Elena Karpova